The client’s requirements were simple: they had an existing Cisco ASA 5505 with a base and unlimited users licence connected to the Internet with a PPPoE interface over ADSL. They wanted to add more bandwidth and redundancy so decided to add an additional 100mbps fibre link. Is it possible? Read on …

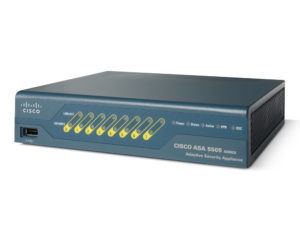
The Cisco ASA 5505 (photo courtesy Cisco Systems)
The Requirements
After a sanity check with the IT manager, here’s an extended list of the requirements:
- Two Internet connections, the primary is 100mbps fibre, the secondary 10mbps ADSL
- All traffic should use the fibre connection, unless that fails in which case all traffic to go via ADSL
- Fail-over time should be about a minute
- After a fail-over, when the fibre link comes back again move traffic back
- No manual intervention or changes required to detect a failure or change traffic routing
- The Cisco Anyconnect remote VPN users should be able to connect to either the fibre or ADSL public IP addresses
These should be no problem for a Cisco ASA, even when it’s restricted by a base licence. Ideally the client should be buying a Security Plus licence to do this – but in this case it’s not strictly necessary so we decided to go ahead and configure the firewall without the additional cost.
What the ASA 5505 Base Licence Means
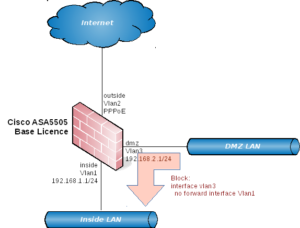
With a base licence you can have up to 3 IP interfaces – with a caveat. You can only have all 3 interfaces if you block connections between any two of them using the no forward interface interface configuration option. So normally your options will be one of:
- Block connections from DMZ to inside
- Block connections from outside to inside (force all via the DMZ)
or some other combination of your choosing.

You would normally block connections from the DMZ to the inside interface
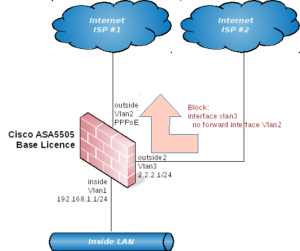
But wait. In our case we don’t have a DMZ but have two Internet connections. So to get all 3 interfaces working we need to block between a pair of them. We don’t want to block traffic between the inside interface and either of the 2 Internet interfaces, which leaves us with one option and that is to block traffic between the two Internet interfaces.
And this should be no problem – there’s no need for the ISPs to talk to each other via those interfaces, so we should be all good to go. The following diagram shows what we want to do, given that we must apply the no forward interface configuration to one interface:

What we really want: if we must block between two interfaces, then block between the two Internet connections
Even though the 5505 is getting a bit old and past it’s end of life, note that the same scenario applies for the newer Cisco ASA 5506-X units which have the same restriction when running on a base licence. Again, as mentioned above, this restriction is removed if you buy the Security Plus licence.
For failover of the routing between the two ISPs we can use ordinary static IP routes with IP SLAs performing the monitoring and updating the metrics for the routes – this function on the ASA is very similar to that on Cisco IOS routers.
Interface Configuration
So let’s get started by configuring the interfaces.

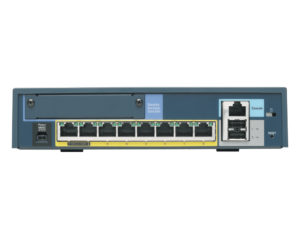
The business end of the 5505 (photo courtesy Cisco Systems)
For the pre-existing ethernet internal interface there’s no change. Here’s its configuration:
|
1 2 3 4 5 6 7 8 9 10 11 12 13 14 15 16 17 18 |
! interface Ethernet0/2 ! interface Ethernet0/3 ! interface Ethernet0/4 ! interface Ethernet0/5 ! interface Ethernet0/6 ! interface Ethernet0/7 ! interface Vlan1 nameif inside security-level 100 ip address 192.168.1.1 255.255.255.0 ! |
Note that we’re using the upper-six ethernet interfaces, all of which belong to VLAN 1, as the internal LAN interfaces.
The existing PPPoE Internet interface is on port Ethernet0/1, here’s its configuration:
|
1 2 3 4 5 6 7 8 9 10 11 12 13 14 15 16 17 18 |
! interface Ethernet0/1 switchport access vlan 3 ! interface Vlan3 description Internet ADSL PPPoE no forward interface Vlan2 nameif isp-1 security-level 0 pppoe client vpdn group PPPOE ip address pppoe setroute ! vpdn group PPPOE request dialout pppoe vpdn group PPPOE localname user@isp-1.domain vpdn group PPPOE ppp authentication pap ! vpdn username user@isp-1.domain password ***** ! |
Configure the login parameters as required by your ISP. Note that we’ve got ip address pppoe setroute set so that the PPPoE process will set the default route automatically to the gateway address that it receives from the PPPoE negotiation.
At this stage, your Internet access should work fine via the PPPoE connection. Note that I haven’t included NAT and policy rules in this example.
Now, lets create the third interface using Ethernet0/0 and VLAN 2 for the second, ethernet-connected ISP:
|
1 2 3 4 5 6 7 8 9 10 |
! interface Ethernet0/0 switchport access vlan 2 ! interface Vlan2 description Internet wired nameif outside security-level 0 ip address 2.2.2.1 255.255.255.0 ! |
This interface will be our preferred route for reaching the Internet, so I’ve called it outside in accordance with Cisco’s convention.
At this stage, the interfaces should all be up and working – buit I haven’t configured the default route to go via the Ethernet and fall-back to the PPPoE connection. This is in the next section below.
Routing and Failover Configuration
Now that we’ve got both Internet connections plumbed up, let’s take a look at routing. We need to meet the following requirements here:
- By default, outgoing traffic should prefer the ethernet interface
- If the internet can’t be reached through ethernet, then fail-over to the PPPoE interface
So firstly, let’s configure an IP SLA to ping Google’s DNS address via the ethernet interface:
|
1 2 3 4 5 6 7 8 9 |
! sla monitor 10 type echo protocol ipIcmpEcho 8.8.8.8 interface outside num-packets 3 timeout 500 frequency 3 ! sla monitor schedule 10 life forever start-time now ! |
Now, let’s configure a static default route to send traffic out the ethernet interface with a metric of 10, and make it dependent on the SLA monitor set above:
|
1 2 3 |
! route outside 0.0.0.0 0.0.0.0 2.2.2.254 10 track 1 ! |
Set the correct gateway here that is required by your ISP.
At this point, the PPPoE interface will still be preferred. Why? This is because the PPPoE negotiation process which sets the default route automatically has set it with a metric less that 10, and therefore it will take precedence. Change the metric that PPPoE configures for the default to something higher that 10 (e.g. 20):
|
1 2 3 4 |
! interface Vlan3 pppoe client route distance 20 ! |
Now we should be good to go. Time to verify that everything is configured OK, and then perform some tests.
Verification and Testing
First, lets take a look at the routing table.
|
1 2 3 4 5 6 7 8 9 10 11 12 13 14 15 16 |
ASA# sh route Codes: C - connected, S - static, I - IGRP, R - RIP, M - mobile, B - BGP D - EIGRP, EX - EIGRP external, O - OSPF, IA - OSPF inter area N1 - OSPF NSSA external type 1, N2 - OSPF NSSA external type 2 E1 - OSPF external type 1, E2 - OSPF external type 2, E - EGP i - IS-IS, L1 - IS-IS level-1, L2 - IS-IS level-2, ia - IS-IS inter area * - candidate default, U - per-user static route, o - ODR P - periodic downloaded static route Gateway of last resort is 2.2.2.254 to network 0.0.0.0 C 2.2.2.1 255.255.255.224 is directly connected, outside C 192.168.1.1 255.255.255.0 is directly connected, inside S* 0.0.0.0 0.0.0.0 [10/0] via 2.2.2.254, outside ASA# |
This looks pretty good. This shows that all traffic will be going out via the outside interface which is the ethernet connection bound to VLAN 2. You’ll notice that the PPPoE interface doesn’t show here – this is because it’s inactive in the routing table. Now, lets check the SLA monitor that we setup to monitor connectivity over the ethernet interface:
|
1 2 3 4 5 6 7 8 9 10 11 12 13 14 15 16 17 18 19 20 21 22 23 24 25 26 27 28 29 |
ASA# sh sla monitor operational-state 10 Entry number: 10 Modification time: 20:59:21.073 NZST Mon Jul 31 2017 Number of Octets Used by this Entry: 1480 Number of operations attempted: 652 Number of operations skipped: 0 Current seconds left in Life: Forever Operational state of entry: Active Last time this entry was reset: Never Connection loss occurred: FALSE Timeout occurred: FALSE Over thresholds occurred: FALSE Latest RTT (milliseconds): 1 Latest operation start time: 21:31:54.075 NZST Mon Jul 31 2017 Latest operation return code: OK RTT Values: RTTAvg: 1 RTTMin: 1 RTTMax: 1 NumOfRTT: 3 RTTSum: 3 RTTSum2: 3 ASA# show track 1 Track 1 Response Time Reporter 10 reachability Reachability is Up 4 changes, last change 00:32:42 Latest operation return code: OK Latest RTT (millisecs) 1 Tracked by: STATIC-IP-ROUTING 0 ASA# |
Again, it’s looking great. The pings are working and therefore the default route via the ethernet is up.
Let’s now check that the PPPoE connection is still in place and available:
|
1 2 3 4 |
ASA# sh int isp-1 ip br Interface IP-Address OK? Method Status Protocol Vlan3 1.1.1.1 YES CONFIG up up ASA# |
All good. But we can’t tell if it’s ready to take over and route traffic if the ethernet goes down. Now let’s test a failure of the ethernet interface:
|
1 2 3 4 5 6 7 8 9 10 11 12 13 14 15 16 17 18 19 |
ASA# conf t ASA(config)# int vlan2 ASA(config-if)# shut ASA(config-if)# ! Wait for a minute at this point ASA(config-if)# show route Codes: C - connected, S - static, I - IGRP, R - RIP, M - mobile, B - BGP D - EIGRP, EX - EIGRP external, O - OSPF, IA - OSPF inter area N1 - OSPF NSSA external type 1, N2 - OSPF NSSA external type 2 E1 - OSPF external type 1, E2 - OSPF external type 2, E - EGP i - IS-IS, L1 - IS-IS level-1, L2 - IS-IS level-2, ia - IS-IS inter area * - candidate default, U - per-user static route, o - ODR P - periodic downloaded static route Gateway of last resort is 1.1.1.254 to network 0.0.0.0 C Inside-LAN 255.255.255.0 is directly connected, inside S* 0.0.0.0 0.0.0.0 [20/0] via 1.1.1.254, isp-1 ASA(config-if)# |
Fantastic! When the ethernet interface was shut down, all routing switched over to the PPPoE interface. It looks like we’re all done here (but don’t forget to no shut that interface before you pack up and go home).
Do some more testing by accessing public web sites while disconnecting and re-connecting the ethernet interface. There should be about 30 seconds delay for the SLA monitor and trigger the fail-over when you disconnect it. When you connect it again, there should be very little delay.
Note that because of the ASA’s state table, long-lived TCP connections will get disconnected during the failover and fail-back process.
Summary
In conclusion it is quite possible for a Cisco ASA 5505, with a restricted base licence, to properly connect to two ISPs and fail-over between them. But note that if you do this then you won’t be able to add any other interfaces to your firewall such as an additional DMZ.
So, if you’re desperate then yes, it can work as this example shows.

1 comment
Excellent , It really helped me to resolve my issue of configuring dual ISP on ASA 5505 with base license. Thank you so much.